一次七牛cdn的盗刷处理

七牛cdn一定要开流量预警,没有预警的情况下是欠费后才能知道,好像有欠费不透支策略不过cdn流量统计有延时,盗刷流量如图所示:

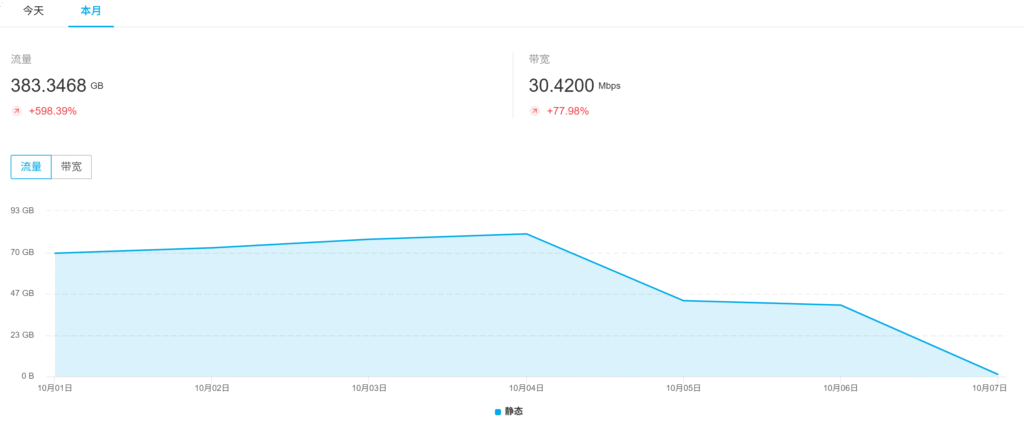
所有流量基本上都来自江苏,只刷特定一个图都高达几十GB,尽量不要把大图或者别的大的资源放到对象存储cdn加速。根据后台的统计分析,查看top100流量和次数的ip,如果是某些ip段的,直接整段封禁。查看刷的资源是什么,如果可以删除,就删除处理,然后在后台刷新预取文件刷新,刷新一下cdn缓存确保资源不能访问。一般刷cdn的也会刷网站首页,我安装了nginx openresty版本,可以使用lua脚本监控网站访问的ip,再根据ip段存入redis有序集合,同时存一份大于某个阈值ip的有序集合,可以监控异常ip访问。如下是监控到的ip段

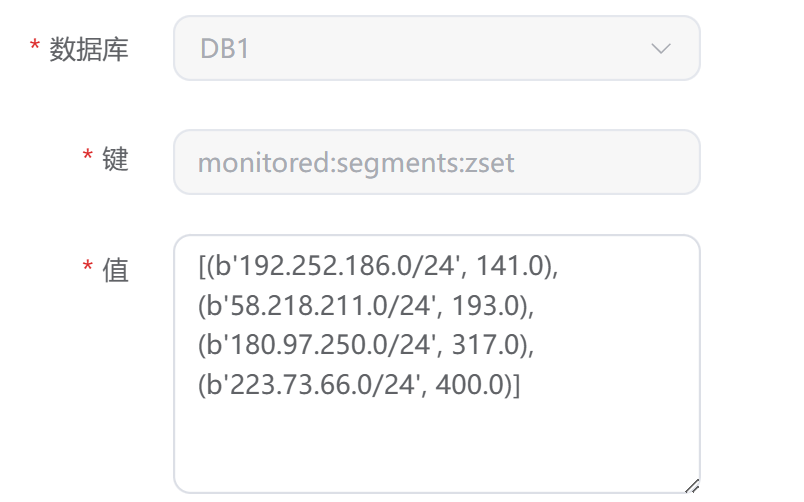
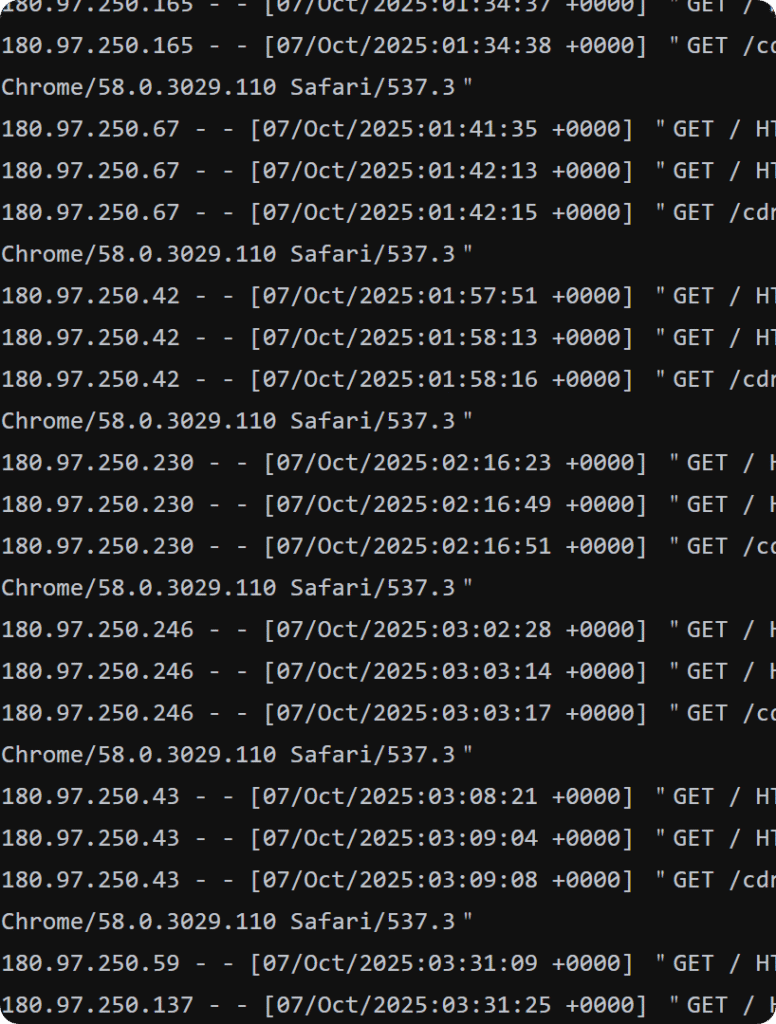
根据ip段去网站日志查询访问记录,果然发现了一个刷流量ip段

可以在nginx和七牛双向拉黑处理

nginx拉黑配置如下

geo $block_ip {
    default 0;
    # CIDR网段封禁
    "58.222.32.0/24"   1;
    "58.222.37.0/24"   1;
    "58.222.48.0/24"   1;
    "122.227.98.0/24"  1;
    "180.97.235.0/24"  1;
    "180.97.250.0/24"  1;
    "180.118.170.0/24" 1;
    "218.90.200.0/24"  1;
    "218.90.204.0/24"  1;
    "221.230.244.0/24" 1;
    "222.186.16.0/24"  1;
    "222.186.132.0/24" 1;
    "222.186.159.0/24" 1;
    "117.136.2.0/24"   1;
    "117.136.47.0/24"  1;
}
server{
    if ($block_ip) {
        return 403;
    }
    location / {
        access_by_lua_file /www/server/nginx/lua/auto_block.lua; # 指定Lua脚本路径
    }
}

lua监控脚本如下

local redis = require "resty.redis"
local red = redis:new()
red:set_timeout(500)

-- 连接到Redis服务器并选择db1
local ok, err = red:connect("127.0.0.1", 6379)
if not ok then
    ngx.log(ngx.ERR, "Failed to connect to Redis: ", err)
    return
end
local res, err = red:auth("xxx", "xxx")
if not res then
    ngx.log(ngx.ERR, "Failed to authenticate Redis: ", err)
    return
end
local ok, err = red:select(1) -- 使用db1
if not ok then
    ngx.log(ngx.ERR, "Failed to select database db1: ", err)
end

-- 获取客户端真实IP
local function get_client_ip()
    local ip = ngx.var.remote_addr
    local xff = ngx.req.get_headers()["X-Forwarded-For"]
    if xff then
        ip = string.match(xff, '([^,]+)')
    end
    return ip
end

-- 正确提取/24网段的函数
local function get_ip_segment(ip)
    local segments = {}
    for segment in string.gmatch(ip, "%d+") do
        table.insert(segments, segment)
    end
    if #segments == 4 then
        return segments[1] .. "." .. segments[2] .. "." .. segments[3] .. ".0/24"
    end
    return "0.0.0.0/24" -- 默认值,防止错误
end

local client_ip = get_client_ip()
local segment = get_ip_segment(client_ip)

-- 定义统计Key和过期时间(1小时=3600秒)
local STAT_EXPIRE = 3600
local ip_count_key = "stat:ip:" .. client_ip
local segment_count_key = "stat:segment:" .. segment

-- 定义监控有序集合Key
local monitored_ips_zset = "monitored:ips:zset"      -- IP监控有序集合
local monitored_segments_zset = "monitored:segments:zset" -- IP段监控有序集合

-- 使用管道提高性能
red:init_pipeline()

-- 统计IP访问次数(刷新过期时间)
red:incr(ip_count_key)
red:expire(ip_count_key, STAT_EXPIRE)

-- 统计IP段访问次数(刷新过期时间)
red:incr(segment_count_key)
red:expire(segment_count_key, STAT_EXPIRE)

-- 执行管道命令
local results, err = red:commit_pipeline()
if not results then
    ngx.log(ngx.ERR, "Failed to commit pipeline: ", err)
else
    local ip_count = results[1]
    local segment_count = results[3]
    
    ngx.log(ngx.INFO, "IP ", client_ip, " count: ", ip_count, 
           " | Segment ", segment, " count: ", segment_count)
    
    -- 检查是否需要加入监控有序集合(1小时内超过100次)
    if ip_count > 100 then
        -- 使用管道批量操作
        red:init_pipeline()
        -- 将IP加入有序集合,score=访问次数
        red:zadd(monitored_ips_zset, ip_count, client_ip)
        -- 刷新有序集合过期时间(24小时)
        red:expire(monitored_ips_zset, 86400)
        -- 刷新计数Key过期时间
        red:expire(ip_count_key, STAT_EXPIRE)
        
        local _, err = red:commit_pipeline()
        if err then
            ngx.log(ngx.ERR, "Failed to update IP zset: ", err)
        else
            ngx.log(ngx.WARN, "IP added to monitored zset (1h>100): ", client_ip, 
                   " with score: ", ip_count)
        end
    end
    
    if segment_count > 100 then
        -- 使用管道批量操作
        red:init_pipeline()
        -- 将IP段加入有序集合,score=访问次数
        red:zadd(monitored_segments_zset, segment_count, segment)
        -- 刷新有序集合过期时间(24小时)
        red:expire(monitored_segments_zset, 86400)
        -- 刷新计数Key过期时间
        red:expire(segment_count_key, STAT_EXPIRE)
        
        local _, err = red:commit_pipeline()
        if err then
            ngx.log(ngx.ERR, "Failed to update segment zset: ", err)
        else
            ngx.log(ngx.WARN, "Segment added to monitored zset (1h>100): ", segment, 
                   " with score: ", segment_count)
        end
    end
end

-- 保持原有连接池设置
red:set_keepalive(10000, 100)

还可以根据预警短信及时获取预警信息,根据自己的业务做拉黑处理,这里贴出七牛php sdk未收录的几个api,七牛官方通知支持短信和钉钉、飞书、企业微信的webhook。不过七牛的设置黑名单有一些问题,api提交以后,返回的是成功信息,这个成功信息是七牛放到队列成功不是配置成功,域名信息那里会显示配置中,但是千万不要以为会成功,有可能是失败的,所以即便cdn预警能hook到服务器,也可能黑名单不能及时配置成功,最终这个自动拉黑没有能实现,而且遇到问题工单也不能及时响应,所以不太建议使用七牛cdn。

<?php
require_once __DIR__ . '/vendor/autoload.php';
use Qiniu\Auth;
use Qiniu\Http\Error;
use Qiniu\Http\Client;
use Dotenv\Dotenv;
/**
* 获取某个cdn域名前100的访问
*/
class CdnManagerv2
{

    private $auth;
    private $server;
    private $proxy;

    public function __construct(Auth $auth)
    {
        $this->auth = $auth;
        $this->server = 'https://fusion.qiniuapi.com';
    }

    /**
     * https://developer.qiniu.com/fusion/4081/cdn-log-analysis#11
     */
    public function getTopCountIp($domain)
    {
        $req = array();
        $req['domains'] = [$domain];
        $req['region'] = 'global';
        $req['startDate'] = date("Y-m-d",time()-86400);
        $req['endDate'] = date("Y-m-d");
        $url = $this->server . '/v2/tune/loganalyze/topcountip';
        $body = json_encode($req);
        return $this->post($url, $body);
    }
    /**
     * https://developer.qiniu.com/fusion/4081/cdn-log-analysis#12
     */
    public function getTopTrafficIp($domain)
    {
        $req = array();
        $req['domains'] = [$domain];
        $req['region'] = 'global';
        $req['startDate'] = date("Y-m-d",time()-86400);
        $req['endDate'] = date("Y-m-d");
        $url = $this->server . '/v2/tune/loganalyze/toptrafficip';
        $body = json_encode($req);
        return $this->post($url, $body);
    }

    private function post($url, $body)
    {
        $headers = $this->auth->authorization($url, $body, 'application/json');
        $headers['Content-Type'] = 'application/json';
        $ret = Client::post($url, $body, $headers, null);
        if (!$ret->ok()) {
            return array(null, new Error($url, $ret));
        }
        $r = ($ret->body === null) ? array() : $ret->json();
        return array($r, null);
    }
}
/**
* 获取域名信息和设置黑名单
*/
class DomainManager
{

    private $auth;
    private $server;

    public function __construct(Auth $auth)
    {
        $this->auth = $auth;
        $this->server = 'https://api.qiniu.com';
    }

    /**
     * https://developer.qiniu.com/fusion/4246/the-domain-name#10
     */
    public function getDomainInfo($domain)
    {
        $url = $this->server . "/domain/".$domain;
        return $this->get($url,'');
    }
    /**
     * https://developer.qiniu.com/fusion/4246/the-domain-name#16
     */
    public function putIpacl($domain,$ips)
    {
        $url = $this->server . "/domain/".$domain."/ipacl";
        $body = ['IPACL'=>['ipACLType'=>"black","ipACLValues"=>$ips]];
        $body = json_encode($body);
        $headers = $this->auth->authorization($url,$body, 'application/json');
        $headers['Content-Type'] = 'application/json';
        $ret = Client::PUT($url,$body,$headers);
        if (!$ret->ok()) {
            return array(null, new Error($url, $ret));
        }
        $r = ($ret->body === null) ? array() : $ret->json();
        return array($r, null);
    }
    private function get($url,$body)
    {
        $headers = $this->auth->authorization($url,$body, 'application/x-www-form-urlencoded');
        $headers['Content-Type'] = 'application/x-www-form-urlencoded';
        $ret = Client::get($url, $headers);
        if (!$ret->ok()) {
            return array(null, new Error($url, $ret));
        }
        $r = ($ret->body === null) ? array() : $ret->json();
        return array($r, null);
    }
}
$dotenv = Dotenv::createImmutable(__DIR__);
$dotenv->load();
$accessKey = getenv('QINIU_ACCESS_KEY');
$secretKey = getenv('QINIU_SECRET_KEY');
$cdn_domain = getenv('CDN_DOMAIN');
$auth = new Auth($accessKey, $secretKey);
$domainManager = new DomainManager($auth);
$info = $domainManager->getDomainInfo($cdn_domain);
$ipACLValues = $info[0]['ipACL']['ipACLValues'];
$ipACLValues = require_once "blackips.php";
$put_ret = $domainManager->putIpacl($cdn_domain,$ipACLValues);
$cdn_manager_v2 = new CdnManagerv2($auth);
$cdn_count = $cdn_manager_v2->getTopCountIp($cdn_domain);
$cdn_data = $cdn_count[0]['data'];
$cdn_data_com = array_combine($cdn_data['ips'],$cdn_data['count']);
$cdn_trafic = $cdn_manager_v2->getTopTrafficIp($cdn_domain);
$cdn_trafic_data = $cdn_trafic[0]['data'];
$cdn_trafic_com = array_combine($cdn_trafic_data['ips'],$cdn_trafic_data['traffic']);
$ip2region = new \Ip2Region('file',__DIR__.'/vendor/zoujingli/ip2region/db/ip2region_v4.xdb');
foreach($cdn_data_com as $key => $value){
    echo mb_convert_encoding($ip2region->simple($key),'GBK', 'UTF-8').$key."<br/>"; // 中国广东省中山市【电信】
}

PHP基于URL下载合成krpano切图平台的原图

步骤一作品解析获取id
<?php
class PanoPageTool
{
    public static function downloadWithNaming($url, $options = []) 
    {
        $defaults = [
            'save_dir' => './downloads/',
            'file_prefix' => '',
            'file_suffix' => '.html',
            'overwrite' => false
        ];
        $options = array_merge($defaults, $options);
        // 提取文件名
        $path = parse_url($url, PHP_URL_PATH);
        $baseName = basename($path);
        if (empty($baseName) || $baseName === 't') {
            $fileName = $options['file_prefix'] . uniqid() . $options['file_suffix'];
        } else {
            $fileName = $options['file_prefix'] . $baseName . $options['file_suffix'];
        }
        $filePath = rtrim($options['save_dir'], '/') . '/' . $fileName;
        // 检查文件是否已存在
        if (!$options['overwrite'] && file_exists($filePath)) {
            return [
                'success' => false,
                'error' => '文件已存在',
                'file_path' => $filePath
            ];
        }
        // 下载内容
        $ch = curl_init($url);
        curl_setopt_array($ch, [
            CURLOPT_RETURNTRANSFER => true,
            CURLOPT_FOLLOWLOCATION => true,
            CURLOPT_USERAGENT => 'Mozilla/5.0',
            CURLOPT_SSL_VERIFYPEER => false,
            CURLOPT_TIMEOUT => 30
        ]);
        $content = curl_exec($ch);
        $info = curl_getinfo($ch);
        curl_close($ch);
        if ($content && $info['http_code'] === 200) {
            // 确保目录存在
            if (!is_dir($options['save_dir'])) {
                mkdir($options['save_dir'], 0755, true);
            }
            if (file_put_contents($filePath, $content)) {
                return [
                    'success' => true,
                    'file_path' => $filePath,
                    'file_name' => $fileName,
                    'size' => filesize($filePath),
                    'url' => $url
                ];
            }
        }
        return [
            'success' => false,
            'error' => '下载失败',
            'http_code' => $info['http_code'] ?? 0,
            'url' => $url
        ];
    }
    public static function extractPanoDataIdRegex($htmlContent)
    {
        // 正则表达式匹配id="pano"的div和data-id属性
        $pattern = '/<div\s+id="pano"[^>]*data-id="([^"]*)"[^>]*>/i';
        if (preg_match($pattern, $htmlContent, $matches)) {
            return [
                'success' => true,
                'data_id' => $matches[1],
                'method' => 'regex'
            ];
        }
        // 备用模式:可能属性顺序不同
        $pattern2 = '/<div[^>]*data-id="([^"]*)"[^>]*id="pano"[^>]*>/i';
        if (preg_match($pattern2, $htmlContent, $matches)) {
            if (!empty($matches[1])) {
                return [
                    'success' => true,
                    'data_id' => $matches[1],
                    'method' => 'regex_alt'
                ];
            }
        }
        return [
            'success' => false,
            'error' => '未找到匹配的div元素或data-id属性'
        ];
    }
}
步骤二全景图还原

多层切图仅需还原最高分辨率

<?php
class KrpanoRestorer {
    private $baseUrl;
    
    public function __construct($baseUrl = '') {
        $this->baseUrl = rtrim($baseUrl, '/');
    }
    
    /**
     * 完整还原流程:下载 → 拼接 → 转换
     */
    public function fullRestoreProcess($xmlContent, $outputDir = 'output/') {
        $scenes = $this->parseScenes($xmlContent);
        
        foreach ($scenes as $scene) {
            echo "开始处理场景: {$scene['name']}\n";
            
            // 1. 下载所有瓦片
            $tilesDir = $this->downloadAllTiles($scene, $outputDir);
            
            // 2. 使用 KRPano 工具生成全景图
            $outputFile = $outputDir . $scene['name'] . '_equirectangular.jpg';
            $this->generateWithKrpanoTools($tilesDir, $scene, $outputFile);
            
            echo "场景 {$scene['name']} 处理完成: {$outputFile}\n";
        }
    }
    
    /**
     * 下载场景的所有瓦片
     */
    private function downloadAllTiles($scene, $baseOutputDir) {
        $level = $scene['levels'][0]; // 使用最高分辨率层级
        $tilesize = (int)$scene['tilesize'];
        $width = (int)$level['tiledimagewidth'];
        $height = (int)$level['tiledimageheight'];
        
        // 计算瓦片数量
        $cols = ceil($width / $tilesize);
        $rows = ceil($height / $tilesize);
        
        $faces = ['l', 'f', 'r', 'b', 'u', 'd'];
        $tilesDir = $baseOutputDir . 'tiles/' . $scene['name'] . '/';
        
        foreach ($faces as $face) {
            $faceDir = $tilesDir . $face . '/';
            if (!file_exists($faceDir)) {
                mkdir($faceDir, 0777, true);
            }
            
            echo "下载 {$face} 面瓦片...\n";
            
            for ($row = 1; $row <= $rows; $row++) {
                for ($col = 1; $col <= $cols; $col++) {
                    $tileUrl = $this->buildTileUrl($level['cube_url'], $face, $row, $col);
                    $tileFile = $faceDir . "tile_{$row}_{$col}.jpg";
                    
                    if (!file_exists($tileFile)) {
                        $this->downloadTile($tileUrl, $tileFile);
                    }
                }
            }
        }
        
        return $tilesDir;
    }
    
    /**
     * 构建瓦片URL
     */
    private function buildTileUrl($urlPattern, $face, $row, $col) {
        return $this->baseUrl . str_replace(
            ['%s', '%v', '%h'],
            [$face, $row, $col],
            $urlPattern
        );
    }
    
    /**
     * 下载单个瓦片
     */
    private function downloadTile($url, $outputPath) {
        $context = stream_context_create([
            'http' => [
                'timeout' => 30,
                'header' => "User-Agent: Mozilla/5.0 (Windows NT 10.0; Win64; x64) AppleWebKit/537.36\r\n"
            ]
        ]);
        
        $content = @file_get_contents($url, false, $context);
        if ($content && file_put_contents($outputPath, $content)) {
            echo ".";
            return true;
        }
        
        echo "F"; // 下载失败
        return false;
    }
    
    /**
     * 使用 KRPano 工具生成全景图
     */
    private function generateWithKrpanoTools($tilesDir, $scene, $outputFile) {
        $level = $scene['levels'][0];
        $tilesize = (int)$scene['tilesize'];
        
        // 首先拼接每个面的完整图像
        $stitchedDir = $tilesDir . 'stitched/';
        if (!file_exists($stitchedDir)) {
            mkdir($stitchedDir, 0777, true);
        }
        
        $faces = [
            'l' => 'left',
            'f' => 'front',
            'r' => 'right', 
            'b' => 'back',
            'u' => 'up',
            'd' => 'down'
        ];
        
        $stitchedFiles = [];
        foreach ($faces as $faceCode => $faceName) {
            $stitchedFile = $stitchedDir . $faceName . '.jpg';
            $this->stitchFace($tilesDir . $faceCode . '/', $stitchedFile);
            $stitchedFiles[$faceCode] = $stitchedFile;
        }
        
        // 构建 KRPano 命令
        $krpanoToolsPath = '/www/wwwroot/test/krpano/krpanotools'; //KRPano 工具路径
        
        // 方法1:使用明确的文件参数
        $command = sprintf(
            '%s cube2sphere -l="%s" -f="%s" -r="%s" -b="%s" -u="%s" -d="%s" -o="%s" -jpegquality=90',
            $krpanoToolsPath,
            $stitchedFiles['l'],
            $stitchedFiles['f'],
            $stitchedFiles['r'],
            $stitchedFiles['b'],
            $stitchedFiles['u'],
            $stitchedFiles['d'],
            $outputFile
        );
        
        echo "执行命令: " . $command . "\n";
        
        exec($command, $output, $returnCode);
        
        if ($returnCode === 0) {
            echo "KRPano 转换成功: {$outputFile}\n";
            return true;
        } else {
            echo "KRPano 转换失败 (" . $returnCode . "): " . implode("\n", $output) . "\n";
            return false;
        }
    }
    
    /**
     * 拼接某个面的所有瓦片成完整图像
     */
    private function stitchFace($faceDir, $outputFile) {
        // 获取所有瓦片文件并按行列排序
        $tiles = [];
        $files = glob($faceDir . 'tile_*.jpg');
        
        foreach ($files as $file) {
            if (preg_match('/tile_(\d+)_(\d+)\.jpg$/', basename($file), $matches)) {
                $row = (int)$matches[1];
                $col = (int)$matches[2];
                $tiles[$row][$col] = $file;
            }
        }
        
        if (empty($tiles)) {
            return false;
        }
        
        // 获取网格尺寸和瓦片大小
        $rows = count($tiles);
        $cols = count($tiles[1]); // 假设第一行有所有列
        
        $firstTile = imagecreatefromjpeg($tiles[1][1]);
        $tileWidth = imagesx($firstTile);
        $tileHeight = imagesy($firstTile);
        imagedestroy($firstTile);
        
        // 创建完整的面图像
        $faceWidth = $cols * $tileWidth;
        $faceHeight = $rows * $tileHeight;
        $faceImage = imagecreatetruecolor($faceWidth, $faceHeight);
        
        // 拼接所有瓦片
        for ($row = 1; $row <= $rows; $row++) {
            for ($col = 1; $col <= $cols; $col++) {
                if (isset($tiles[$row][$col])) {
                    $tileImg = imagecreatefromjpeg($tiles[$row][$col]);
                    $x = ($col - 1) * $tileWidth;
                    $y = ($row - 1) * $tileHeight;
                    imagecopy($faceImage, $tileImg, $x, $y, 0, 0, $tileWidth, $tileHeight);
                    imagedestroy($tileImg);
                }
            }
        }
        
        // 保存拼接后的面图像
        imagejpeg($faceImage, $outputFile, 90);
        imagedestroy($faceImage);
        
        return true;
    }
    
    /**
     * 解析场景信息
     */
    private function parseScenes($xmlContent) {
        $xml = simplexml_load_string($xmlContent);
        $scenes = [];
        
        foreach ($xml->scene as $scene) {
            $sceneInfo = [
                'name' => (string)$scene['name'],
                'view_id' => (string)$scene['view_id'],
                'tilesize' => (string)$scene->image['tilesize'],
                'levels' => []
            ];
            
            foreach ($scene->image->level as $level) {
                $sceneInfo['levels'][] = [
                    'tiledimagewidth' => (string)$level['tiledimagewidth'],
                    'tiledimageheight' => (string)$level['tiledimageheight'],
                    'cube_url' => (string)$level->cube['url']
                ];
            }
            
            $scenes[] = $sceneInfo;
        }
        
        return $scenes;
    }
}
?>
调用还原类还原图片
<?php
include_once('PanoPageTool.php');
include_once('KrpanoRestorer.php');

class DownloadPanoProjectPics
{
    private $url;
    private $project_html_file_name;
    private $project_id = 0;
    public function __construct($url)
    {
        $this->url = $url;
    }
    //步骤1:下载作品HTML页面
    public function step1()
    {
        $options = [
            'save_dir' => './my_pages/',
            'file_prefix' => 'page_',
            'overwrite' => true
        ];
        $result = PanoPageTool::downloadWithNaming($this->url ,$options);
        if($result['success'])
        {
            $this->project_html_file_name = $result['file_name'];
            echo "步骤1:成功下载作品页面: " . $result['file_name'] . "\n";
        }else{
            echo "步骤1:失败\n";
            exit;
        }
    }
    //步骤2: 作品页面正则匹配作品id
    public function step2()
    {
        $content = file_get_contents("./my_pages/".$this->project_html_file_name);
        $result = PanoPageTool::extractPanoDataIdRegex($content);
        if($result['success']){
            $this->project_id = $result['data_id'];
            echo "步骤2:解析project_id成功,准备下载xml文件\n";
        }else{
            echo "步骤2:解析project_id失败\n";
            exit;
        }
    }
    //步骤3:下载xml文件
    public function step3()
    {
        $url = "https://xxx/xml/".$this->project_id.".html";
        file_put_contents("./my_pages/".$this->project_id.".html",file_get_contents($url));
        if(file_exists(__DIR__."/my_pages/".$this->project_id.".html"))
        {
            echo "步骤3:下载xml文件成功\n";
        }else{
            echo "步骤3:下载xml文件失败\n";
        }
    }
    //步骤4:解析xml文件 解析图片 f b l r u d
    public function step4()
    {
        $restorer = new KrpanoRestorer('https://xxx/');
        $xmlContent = file_get_contents("./my_pages/".$this->project_id.".html");
        // 设置更大的内存限制和时间限制
        ini_set('memory_limit', '1024M');
        set_time_limit(0);
        $restorer->fullRestoreProcess($xmlContent, 'restored_output/'.$this->project_id.'/');
    }

    public function start()
    {
        $this->step1();
        $this->step2();
        $this->step3();
        $this->step4();
    }
}
$tool = new DownloadPanoProjectPics("https://xxx/pano_id");
$tool->start();
?>

vscode配置php-src源码调试

虚拟机安装PHP

先下载一个Linux镜像,我选择Ubuntu镜像server版

基于上述镜像添加虚拟机,按提示填写地区和用户信息

登录服务器安装远程连接软件

#安装ssh服务
apt install openssh-server
systemctl start ssh
ufw allow 22
#virtual box添加端口映射2222->22

虚拟机添加共享文件夹

D:\VirtualBox VMs\php8.4\share,共享名sharephp840,共享到/home/xiao/share

xiao# sudo mount -t vboxsf sharephp840 ./share
xiao# vim /etc/fstab # 添加 sharephp840 /home/xiao/share vboxsf defaults 0 0

下载php源码拷贝到共享文件夹

tar -zxvf php-8.4.0.tar.gz
sudo apt update
sudo apt install build-essential libxml2-dev libssl-dev libcurl4-openssl-dev libjpeg-dev libpng-dev libfreetype6-dev libzip-dev libsqlite3-dev
./configure --prefix=/home/codes/php/php-8.4.0/output/ --enable-fpm --enable-debug CFLAGS="-g3 -O0"# -g3 保留宏信息,-O0 禁用优化
make
make install
配置vscode

安装Remote-SSH扩展

按住ctrl+shift+p打开命令面板,找到remote-ssh:connect to host…,输入上述虚拟机连接信息,连接成功后打开虚拟机上的PHP源码目录。

在vscode侧边栏,点击run and debug,创建一个launch.json,添加配置信息如下:

{
    "version": "0.2.0",
    "configurations": [
        {
            "name": "Debug PHP Core",
            "type": "cppdbg",
            "request": "launch",
            "program": "/home/codes/php/php-8.4.0/output/bin/php",
            "args": [
                "/home/xiao/share/php/array.php"
            ],
            "cwd": "/home/xiao/share/php-8.4.0",
            "environment": [],
            "MIMode": "gdb",
            "setupCommands": [
                {
                    "description": "Enable pretty-printing for gdb",
                    "text": "-enable-pretty-printing",
                    "ignoreFailures": true
                }
            ]
        }
    ]
}

下面就可以在php源码设置断点调试了

一次接口nginx502的排查经历

接口是一个生成全景作品的接口,接口会经历下载、切图、上传三个步骤。接口大部分时间运行是正常的,图片数量过多时会Nginx502。

排查经历

首先了解502是什么类型的错误,502 错误表明 Nginx 作为代理服务器时,无法从上游服务PHP-FPM获取有效响应。

先排查nginx配置的超时时间

是否超时时间过短导致的服务断开。nginx超时相关配置为/www/server/nginx/conf/proxy.conf

proxy_connect_timeout 60;# 连接上游超时
proxy_read_timeout 300;# 读取响应超时
proxy_send_timeout 120;# 发送请求超时

调大连接上游超时和读取响应超时,程序在多图时依然502。

考虑调整php.ini配置

看到接口设置了set_time_limit(0);和ini配置max_execution_time一样只影响脚本本身执行的时间,已经设置了不超时,可是程序还是提前退出了。

考虑调整php-fpm配置

/www/server/php/73/etc/php-fpm.conf

其中有一个配置是

request_terminate_timeout = 300s #整个PHP进程生存时间

进程超时优先大于脚本执行超时,如下图示:

所以会出现set_time_limit(0);不生效

临时解决

调大上述参数

终极解决

切图任务不要放在控制器处理,改用消息队列。

一次搬迁服务器到ctyun

记一次帮别人搬迁全景服务器到ctyun,原服务器在腾讯续费八千多,在ctyun买了一个s6 485配置的机器5年3000,于是搬迁到ctyun了。服务器数据盘有大概480g全景图,不准备在ctyun买数据盘存储了,500g数据盘5年价格3000多。在腾讯领了一个半年1t试用cos,把数据备份了一份到cos,跑了约一天全部上传完成。由于之前全景图在七牛,浏览的时候回源本地数据盘的图片,导致七牛的数据不完整的,决定再传一份到七牛,传了约1天跑了10%数据,感觉上传较慢,由于是在服务器到期前两三天搬迁的,服务器停机也没上传完成。我就把七牛的回源地址指向cos解决。此外数据库的数据有一部分是指向本地路径,此时本地数据已经删除了,cos有完整备份,本地图片nginx代理访问cos解决。

配置本地图片代理访问cos
# 设置目标 COS 信息
set $cos_bucket "xxx";
set $cos_region "ap-xxx";
set $cos_host "${cos_bucket}.cos.${cos_region}.myqcloud.com";
# DNS 解析配置
resolver 114.114.114.114 223.5.5.5 8.8.8.8 valid=30s;
resolver_timeout 5s;
# 核心代理配置:精确匹配 /vrimages/ 路径
location ^~ /vrimages/ {
  # 精确代理到 COS 路径
  proxy_pass https://$cos_host$request_uri;
  # 必须的头部设置
  proxy_set_header Host $cos_host;
  proxy_set_header X-Real-IP $remote_addr;
  proxy_set_header X-Forwarded-For $proxy_add_x_forwarded_for;
  proxy_set_header X-Forwarded-Proto $scheme;
  # HTTPS 配置
  proxy_ssl_server_name on;
  proxy_ssl_session_reuse on;
  proxy_ssl_protocols TLSv1.2 TLSv1.3;
  # 性能优化
  proxy_connect_timeout 5s;
  proxy_send_timeout 10s;
  proxy_read_timeout 20s;
  proxy_buffer_size 64k;
  proxy_buffers 16 64k;
  proxy_busy_buffers_size 128k;
  # 添加源识别头
  add_header X-Origin "Tencent-COS";
  add_header X-Cos-Bucket $cos_host;
  # 缓存控制
  proxy_cache_valid 200 304 30d;
  add_header Cache-Control "public, max-age=2592000";
}
备份cos和七牛
./coscli cp ./xxx/vrimages/ cos://xxx/vrimages -r
./qshell account ak as name #设置账号
./qshell qupload2 --src-dir=/www/wwwroot/xxx/vrimages/ --bucket=xxx --accelerate --check-exists --log-level=error --record-root=/www/wwwroot/log

上传七牛一定要指定log-level,不然会产生很多日志。

项目集成illuminate/database

迁移的项目很古老了,原来的查询写法比较难用,集成了illuminate/database,提升开发效率。

<?php
require_once __DIR__."/../vendor/autoload.php";
$db_config = include_once __DIR__."/../config/db.php";
use Illuminate\Support\Facades\DB;
use Illuminate\Database\Capsule\Manager as Capsule;
use Illuminate\Container\Container;
$container = new Container;
$capsule = new Capsule($container);
$capsule->addConnection($db_config);
// 设置全局静态访问
$capsule->setAsGlobal();
// 启动 Eloquent ORM
$capsule->bootEloquent();
// 将数据库管理器实例绑定到容器,键名为'db'
$container->instance('db', $capsule->getDatabaseManager());
Container::setInstance($container);
// 设置 Facade 的根容器
Illuminate\Support\Facades\Facade::setFacadeApplication($container);
return $capsule;
<?php
require __DIR__ . '/vendor/autoload.php';
$capsule = require __DIR__ . '/bootstrap/database.php';
// 设置默认时区
date_default_timezone_set('Asia/Shanghai');
// 示例使用
use Illuminate\Support\Facades\DB;
DB::enableQueryLog(); //使支持查询日志
//查询删除超过30天的作品
$worksmain = DB::table('worksmain')->select('pk_works_main')->where(function($query){
    //$query->where('delete_time','<=',time()-30*86400)->where('delete_time','>',0);
    $query->where('delete_time','>',0);
})->get();
require_once __DIR__.'/source/include/cls_queue.php';
foreach($worksmain as $v){
    QueueClient::push('delWorksImage',['pk_works_main'=>$v->pk_works_main]);
}
//print_r(DB::getQueryLog());

ThinkPHP8集成RabbitMQ

环境配置
# 添加Erlang仓库
wget -O- https://packages.erlang-solutions.com/ubuntu/erlang_solutions.asc | sudo apt-key add -
echo "deb https://packages.erlang-solutions.com/ubuntu $(lsb_release -sc) contrib" | sudo tee /etc/apt/sources.list.d/rabbitmq.list
# 更新包索引
sudo apt-get update
# 安装Erlang
sudo apt-get install -y erlang-base \
                        erlang-asn1 erlang-crypto erlang-eldap erlang-ftp erlang-inets \
                        erlang-mnesia erlang-os-mon erlang-parsetools erlang-public-key \
                        erlang-runtime-tools erlang-snmp erlang-ssl \
                        erlang-syntax-tools erlang-tftp erlang-tools erlang-xmerl
# 添加RabbitMQ仓库
echo "deb https://dl.bintray.com/rabbitmq/debian $(lsb_release -sc) main" | sudo tee /etc/apt/sources.list.d/rabbitmq.list
# 导入RabbitMQ公钥
wget -O- https://www.rabbitmq.com/rabbitmq-release-signing-key.asc | sudo apt-key add -
# 安装 rabbitmq-server
sudo apt-get install rabbitmq-server
sudo systemctl start rabbitmq-server
sudo systemctl enable rabbitmq-server  # 设置开机自启
# 安装librabbitmq开发库
sudo apt-get install -y librabbitmq-dev
# 安装php 扩展
pecl install amqp
# 安装php 客户端
composer require videlalvaro/php-amqplib
集成代码
//rabbitmq配置
<?php
return [
    'host' => env('RABBITMQ_HOST', 'localhost'),
    'port' => env('RABBITMQ_PORT', 5672),
    'user' => env('RABBITMQ_USER', 'guest'),
    'password' => env('RABBITMQ_PASSWORD', 'guest'),
    'vhost' => env('RABBITMQ_VHOST', '/'),
    'connection_timeout' => 3.0,
    'read_write_timeout' => 3.0,
    'heartbeat' => 0,
];
<?php
namespace app\service;

use PhpAmqpLib\Connection\AMQPStreamConnection;
use PhpAmqpLib\Message\AMQPMessage;
use think\facade\Config;

class RabbitMQService
{
    protected $connection;
    protected $channel;

    public function __construct()
    {
        $config = Config::get('rabbitmq');
        $this->connection = new AMQPStreamConnection(
            $config['host'],
            $config['port'],
            $config['user'],
            $config['password'],
            $config['vhost'],
            false,
            'AMQPLAIN',
            null,
            'en_US',
            $config['connection_timeout'],
            $config['read_write_timeout'],
            null,
            $config['heartbeat']
        );
        $this->channel = $this->connection->channel();
    }

    public function getChannel()
    {
        return $this->channel;
    }

    public function close()
    {
        $this->channel->close();
        $this->connection->close();
    }
}
<?php
namespace app\service;
use PhpAmqpLib\Message\AMQPMessage;

class RabbitMQProducer extends RabbitMQService
{
    public function publish($exchange, $routingKey, $message, $params = [])
    {
        // 声明交换机
        $this->channel->exchange_declare(
            $exchange,      // 交换机名称
            'direct',       // 交换机类型(根据需求修改)
            false,          // 是否被动声明(仅检查是否存在)
            true,           // 是否持久化
            false           // 是否自动删除
        );
        // 声明队列 直连模式
        $this->channel->queue_declare(
            'my_queue', // 队列名称
            false, // 是否被动声明(仅检查是否存在)
            true, // 是否持久化
            false, // 是否排他(仅对当前连接可见)
            false // 是否自动删除
        );
        $msg = new AMQPMessage(
            $message,
            array_merge([
                'content_type' => 'text/plain',
                'delivery_mode' => AMQPMessage::DELIVERY_MODE_PERSISTENT
            ], $params)
        );

        $this->channel->basic_publish($msg, $exchange, $routingKey);
    }
}
<?php
namespace app\service;
class RabbitMQConsumer extends RabbitMQService
{
    public function consume($queue, $callback, $noAck = false)
    {
        // 声明交换机(如果不存在则创建)
        $this->channel->exchange_declare(
            'my_exchange',  // 交换机名称
            'direct',       // 交换机类型(根据需求修改)
            false,          // 是否被动声明
            true,           // 是否持久化
            false           // 是否自动删除
        );
        // 声明队列(如果不存在则创建)
        $this->channel->queue_declare($queue, false, true, false, false);
        // 将队列绑定到交换机
        $this->channel->queue_bind($queue, 'my_exchange', 'my_routing_key');
        $this->channel->basic_consume(
            $queue,
            '',
            false,
            $noAck,
            false,
            false,
            $callback
        );
        while ($this->channel->is_open()) {
            $this->channel->wait();
        }
    }
}
<?php
declare (strict_types = 1);
namespace app\controller;
use app\BaseController;
use app\service\RabbitMQProducer;
class Rabbitmq extends BaseController
{
    public function sendMessage()
    {
        $producer = new RabbitMQProducer();
        $producer->publish(
            'my_exchange',      // 交换机名称
            'my_routing_key',   // 路由键
            json_encode([       // 消息内容
                'user_id' => 1234,
                'action' => 'login',
                'time' => time()
            ])
        );
        $producer->close();
        return json(['code' => 200, 'msg' => '消息发送成功']);
    }
}
<?php
declare (strict_types = 1);

namespace app\command;

use think\console\Command;
use think\console\Input;
use think\console\input\Argument;
use think\console\input\Option;
use think\console\Output;
use app\service\RabbitMQConsumer;

class ConsumeMessage extends Command
{
    protected function configure()
    {
        // 指令配置
        $this->setName('rabbitmq:consume')
             ->setDescription('消费RabbitMQ消息');
    }

    protected function execute(Input $input, Output $output)
    {
        $consumer = new RabbitMQConsumer();
        $consumer->consume('my_queue', function ($message) use ($output) {
            $data = json_decode($message->body, true);
            $output->writeln("收到消息: " . print_r($data, true));
            
            // 处理完消息后确认
            $message->ack();
        });
        $consumer->close();
    }
}
测试
http://www.thinkphp8.test/rabbitmq/sendMessage
~ php think rabbitmq:consume #可以看到投递的消息 可以supervisor 管理
消息类型

常见消息模式

  • 直连模式:消息根据路由键(routing key)直接路由到队列。生产者和消费者都需要声明队列,确保队列存在。生产者通过交换机和路由键发送消息,消费者从队列接收消息。
  • 扇形模式:消息广播到所有绑定的队列,忽略路由键。每个消费者需要声明自己的队列,并绑定到扇形交换机。生产者只需向交换机发送消息,无需关心队列。
  • 主题模式:消息根据路由键的模式(如*.error)路由到多个队列。消费者声明队列并绑定到主题交换机,指定绑定键(如order.#)。生产者根据业务逻辑设置路由键。

记录一次PHP面试题

题目1 如何设计接口可以防止重复点击,扣减库存如何保证幂等性?

简单实现

<?php
namespace app\controller;
use app\BaseController;
use think\facade\Cache;
use think\facade\Db;
use Ramsey\Uuid\Uuid;

class Idempotent extends BaseController
{
    /**
     * 幂等性:一次和多次请求某一个资源应该具有同样的副作用。
     * 幂等号:UUID、业务唯一标识组合
     * 方案1:客户端生成幂等号
     * 客户端发起扣费请求时,必须生成并携带一个全局唯一的幂等号,服务端收到某个幂等号请求时执行扣库存,将幂等号扣减结果Redis或数据库持久化。后续请求先判断幂等号是否存在,如果存在返回之前的结果。如果不存在按新请求处理。
     * 幂等号必须由客户端生成并确保唯一,对幂等号的检查、扣库存、结果存储在同一个事务,确保原子性。
     */
    public function index()
    {
        try {
            $data = $this->request->param();
            $uniqueId = $data['uniqueId'];
            $productId = $data['productId'];
            $key = 'idempotent:'.$uniqueId;
            // 检查幂等号是否存在
            if (Cache::has($key)) {
                return json(Cache::get($key));
            }
            Cache::set($key, 0, 86400);//状态0为未处理
            // 检查是否有扣减记录
            $deductRecord = Db::table('deduct_records')
                ->where('unique_id', $uniqueId)
                ->find();
            if ($deductRecord) {
                if ($deductRecord['status'] == 'success') {
                    // 已经成功扣减过库存,直接返回结果
                    return json([
                        'status' => 'success'
                    ]);
                }else if ($deductRecord['status'] == 'error'){
                    // 已经失败扣减过库存,直接返回结果
                    return json([
                        'status' =>'error',
                        'error_message' => $deductRecord['error_message']
                    ]);
                }
            }
            // 开启数据库事务
            Db::startTrans();
            // 扣减库存
            $inventory = Db::table('product_inventory')
                ->where('product_id', $productId)
                ->lock(true)
                ->find();
            if ($inventory['stock'] <= 0) {
                throw new \Exception('库存不足');
            }
            // 扣减库存操作
            Db::table('product_inventory')
                ->where('product_id', $productId)
                ->dec('stock')
                ->update();
            // 持久化结果
            $result = [
                'status' => 'success',
                'unique_id' => $uniqueId,
                'product_id' => $productId,
                'deducted' => 1,
                'timestamp' => time()
            ];
            // 记录扣减记录 方便对库存 建立定期对库存的监控兜底
            Db::table('deduct_records')->insert($result);
            // 事务提交
            Db::commit();
            // 存储到Redis(设置24小时过期)
            Cache::set($key, $result, 86400);
            return json($result);
        } catch (\Exception $e) {
            Db::rollback();
            Cache::delete($key);
            // 添加失败记录
            Db::table('deduct_records')->insert([
                'status' => 'error',
                'unique_id' => $uniqueId,
                'product_id' => $productId,
                'error_message' => $e->getMessage(),
                'timestamp' => time()
            ]);
            return json([
                'status' => 'error',
                'message' => $e->getMessage()
            ]);
        }
    }
    /**
     * 方案2:服务端生成 token
     * 客户端会先发送一个请求去获取 token,服务端会生成一个全局唯一的 ID 作为 token 保存在 redis 中,同时把这个 ID 返回给客户端
     * 客户端第二次调用业务请求的时候必须携带这个 token
     * 服务端会校验这个 token,如果校验成功,则执行业务,并删除 redis 中的 token
     * 如果校验失败,说明 redis 中已经没有对应的 token,则表示重复操作,直接返回指定的结果给客户端
     * 对 redis 中是否存在 token 以及删除的代码逻辑建议用 Lua 脚本实现,Lua脚本在Redis中执行是原子的,可以避免竞态条件
     */
    public function getToken()
    {
        try {
            $token = Uuid::uuid4()->toString();
            $key = 'idempotent_token:'. $token;
            $redis = Cache::store('redis')->handler();
            $redis->set($key, 1, 86400);
            return json([
                'code' => 200,
                'msg'  => '操作成功',
                'data' => [
                    'token' => $token
                ]
            ]);
        } catch (\Exception $e) {
            return json([
                'code' => 500,
                'msg'  => '操作失败: '.$e->getMessage()
            ]);
        }
    }
    public function checkToken()
    {
        try {
            $data = $this->request->param();
            $token = $data['token'] ?? '';
            if (empty($token)) {
                throw new \Exception('缺少必要参数: token');
            }
            $key = 'idempotent_token:' . $token;
            $lua = <<<LUA
                if redis.call("GET", KEYS[1]) then
                    redis.call("DEL", KEYS[1])
                    return 1
                else
                    return 0
                end
                LUA;
            // 执行原子性校验
            $redis = Cache::store('redis')->handler();
            $result = $redis->eval($lua, [$key], 1);
            if ($result !== 1) {
                return json([
                    'code' => 400,
                    'msg'  => '重复请求或无效Token'
                ]);
            }
            // 执行业务逻辑
            Db::name('product_inventory')
                ->where('product_id', $data['product_id'])
                ->dec('stock')
                ->update();
            return json([
                'code' => 200,
                'msg'  => '操作成功'
            ]);
        } catch (\Exception $e) {
            return json([
                'code' => 500,
                'msg'  => '操作失败: '.$e->getMessage()
            ]);
        }
    }
    /**
     * 方案3:根据带唯一索引的MySQL+状态机实现
     * 插入失败就拒绝请求
     * 插入成功就继续执行
     **/
    public function insertIndex()
    {
        try {
            $data = $this->request->param();
            $uniqueId = $data['uniqueId'];
            $productId = $data['productId'];
            // 开启数据库事务
            Db::startTrans();
            // 先尝试插入记录
            $record = [
                'unique_id' => $uniqueId,
                'product_id' => $productId,
                'status' => 'processing',
                'timestamp' => time()
            ];
            Db::table('deduct_records')
                ->strict(false)
                ->insert($record);
            // 扣减库存
            $affected = Db::table('product_inventory')
                ->where('product_id', $productId)
                ->where('stock', '>', 0)
                ->dec('stock')
                ->update();
            if ($affected === 0) {
                throw new \Exception('库存不足');
            }
            // 更新记录状态
            Db::table('deduct_records')
                ->where('unique_id', $uniqueId)
                ->update(['status' => 'success']);
            Db::commit();
            return json([
                'status' => 'success',
                'unique_id' => $uniqueId
            ]);
        } catch (\Exception $e) {
            Db::rollback();
            // 处理唯一键冲突(错误码23000)
            if ($e->getCode() == '23000') {
                return json([
                    'status' => 'error',
                    'message' => '重复请求'
                ]);
            }
            return json([
                'status' => 'error',
                'message' => $e->getMessage()
            ]);
        }
    }
    /**
     * 方案4:基于Redis 分布式锁实现
     * 使用SETNX原子操作实现分布式锁,确保只有一个请求可以执行扣减操作
     **/
    public function setNx()
    {
        try {
            $data = $this->request->param();
            $uniqueId = $data['uniqueId'];
            $productId = $data['productId'];
            $key = 'idempotent:'.$uniqueId;
            $redis = Cache::store('redis')->handler();
            // 使用SETNX原子操作
            $lockAcquired = $redis->setnx($key, 1);
            if (!$lockAcquired) {
                return json([
                    'code' => 400,
                    'msg' => '重复请求,请勿重复提交'
                ]);
            }
            $redis->expire($key, 86400);
            // 开启数据库事务
            Db::startTrans();
            // 扣减库存
            $inventory = Db::table('product_inventory')
                ->where('product_id', $productId)
                ->lock(true)
                ->find();
            if (!$inventory || $inventory['stock'] <= 0) {
                throw new \Exception('库存不足');
            }
            Db::table('product_inventory')
                ->where('product_id', $productId)
                ->dec('stock')
                ->update();
            // 保存记录
            $record = [
                'unique_id' => $uniqueId,
                'product_id' => $productId,
                'status' => 'success',
                'timestamp' => time()
            ];
            Db::table('deduct_records')->insert($record);
            Db::commit();
            return json([
                'code' => 200,
                'msg' => '操作成功',
                'data' => $record
            ]);
        } catch (\Exception $e) {
            Db::rollback();
            // 删除Redis锁
            Cache::delete($key);
            return json([
                'code' => 500,
                'msg' => '操作失败: '.$e->getMessage()
            ]);
        }
    }
    /**
     * 方案5:基于MySQL的乐观锁加版本号实现
     **/
    public function optimisticLock()
    {
        try {
            $data = $this->request->param();
            $uniqueId = $data['uniqueId'];
            $productId = $data['productId'];
            // 开启事务
            Db::startTrans();
            // 获取当前版本号
            $inventory = Db::table('product_inventory')
                ->where('product_id', $productId)
                ->lock('lock in share mode')
                ->field('stock,version')
                ->find();
            if (!$inventory || $inventory['stock'] <= 0) {
                throw new \Exception('库存不足');
            }
            // 带版本号的更新操作
            $affected = Db::table('product_inventory')
                ->where('product_id', $productId)
                ->where('version', $inventory['version'])
                ->dec('stock')
                ->inc('version')
                ->update();
            if ($affected === 0) {
                throw new \Exception('操作冲突,请重试');
            }
            // 记录扣减操作
            $record = [
                'unique_id' => $uniqueId,
                'product_id' => $productId,
                'status' => 'success',
                'timestamp' => time()
            ];
            Db::table('deduct_records')->insert($record);
            Db::commit();
            return json([
                'code' => 200,
                'msg' => '操作成功',
                'data' => $record
            ]);
        } catch (\Exception $e) {
            Db::rollback();
            return json([
                'code' => 500,
                'msg' => '操作失败: '.$e->getMessage()
            ]);
        }
    }
}
-- 商品库存表
CREATE TABLE product_inventory (
  product_id INT PRIMARY KEY COMMENT '商品ID',
  stock INT NOT NULL DEFAULT 0 COMMENT '库存数量'
  version INT NOT NULL DEFAULT 0 COMMENT '版本号'
);
-- 扣库存表
CREATE TABLE deduct_records (
  id INT AUTO_INCREMENT PRIMARY KEY,
  unique_id VARCHAR(64) NOT NULL UNIQUE,
  product_id INT NOT NULL,
  status VARCHAR(20) NOT NULL,
  deducted INT NOT NULL,
  timestamp INT NOT NULL,
  error_message VARCHAR(255) NOT NULL DEFAULT ''
);
ab -n 10 -c 10 'http://www.thinkphp8.test/idempotent/index?uniqueId=test136&productId=1' #ab模拟10次并发
#客户端uuid 包nanoid https://github.com/ai/nanoid,包uuid https://github.com/uuidjs/uuid

概念参考 https://xie.infoq.cn/article/e2752bf22f3a9e4f9ce2c404e

题目2 Redis如何保证和数据库数据一致性

  1. 旁路缓存模式:读流程:读缓存命中返回,未命中读库,写入缓存返回。写流程:方案1先更数据库再删缓存。应对更新库后和删除缓存之间读取的缓存旧数据问题,可以延迟一小时后双删。方案2先删缓存,再更新数据库。不一致问题更严重,也可以延迟双删解决。删除缓存可以交给消息队列异步操作。
  2. 写穿透模式:应用层将写操作交给一个抽象层处理。该层负责同步更新数据库、同步更新缓存。
  3. 写回模式:只更新缓存,缓存层异步更新数据到数据库。适用日志场景,容忍一部分数据丢失。
  4. 订阅数据库变更日志(Binlog/CDC),把变更事件发送到消息队列。

题目3 PHP有哪些运行模式

  1. cgi/fastcgi模式:fastcgi模式,核心思想进程常驻,fpm主进程管理一个进程池,请求交给空闲进程处理。
  2. 模块模式
  3. cli模式

题目4 中间件的架构模式或设计思想

  1. 责任链模式:一个请求经过管道的每个中间件 req next res
  2. 管道-过滤器模式:数据流经管道被每个过滤器处理
  3. 体现了解耦、可插拔性/开闭原则、可组合性、横切关注点集中处理、IOC/DI

Yaf集成think-orm4

目前最新yaf版本3.3.6,可以在PHP8.3上成功安装。

安装步骤
#下载最新代码
wget https://pecl.php.net/get/yaf-3.3.6.tgz
#解压
tar -zxvf yaf-3.3.6.tgz
#安装
cd yaf-3.3.6/
phpize
./configure --with-php-config=/www/server/php/83/bin/php-config
make && make install
#修改php.ini 添加yaf.so
#克隆yaf
git clone https://github.com/laruence/yaf.git
#生成项目skeleton
cd /www/wwwroot/yaf/tools/cg
php yaf_cg -d Sample -n
安装think-orm
sudo -u www composer require topthink/think-orm
#入口引入think-orm
require __DIR__ . '/vendor/autoload.php';
添加数据库配置
[think-orm]
db.type     = mysql
db.hostname = 127.0.0.1
db.username = yaf
db.password = myGEFhY7FKhKME3m
db.database = yaf
db.charset  = utf8mb4
db.prefix   = yaf_
db.debug    = true
初始化数据库配置
<?php
class Bootstrap extends \Yaf\Bootstrap_Abstract {
    public function _initDb(){
        $ini = new \Yaf\Config\Ini(__DIR__."/../conf/db.ini");
        $arr = $ini->toArray();
        $config = ['default'=>'mysql','connections'=>['mysql'=>$arr['think-orm']['db']]];
        (new \think\DbManager())->setConfig($config);
    }
}
配置模型
<?php
use think\Model;
/**
 * @name SampleModel
 * @desc sample模型类 可以使用模型的属性和方法
 * @author root
 */
class SampleModel extends Model{
    protected $table = "yaf_sample";
    public function selectSample() {
        return 'Hello World!';
    }

    public function insertSample($arrInfo) {
        return true;
    }
}
think-orm4新特性Enity引入
<?php
class Bootstrap extends \Yaf\Bootstrap_Abstract {
    public function _initLoader($dispatcher) {
        \Yaf\Loader::getInstance()->registerNamespace('App\Entity', realpath(APPLICATION_PATH . '/application/entity'));
    }
}
Enity sample
<?php
namespace App\Entity;
use think\Entity;
/**
 * @name SampleEntity
 * @desc sample实体类 可以扩展业务逻辑 让模型专注查询、持久化数据
 * @author root
 */
class SampleEntity extends Entity
{
    public function getOptions():array
    {
    	return [
            'modelClass'      => \SampleModel::class,
    	];
    }
}
Enity使用
$entity = new \App\Entity\SampleEntity();
$one = \App\Entity\SampleEntity::find(1);

PHP Empty函数深入理解

empty() 函数用于检查一个变量是否为空,如果变量为空,则返回 true,否则返回 false。对于对象属性,空的定义取决于属性的可见性。

在 PHP 中,对象的属性有公有(public)、私有(private)和受保护(protected)三种可见性。公有属性可以直接从对象外部访问,而私有属性和受保护属性不能直接从对象外部访问。

当使用 empty() 函数检查一个对象的属性时,如果属性是私有的或受保护的,不管在对象内部有无赋值,那么 empty() 函数会返回 true,因为从对象外部无法直接访问到这个属性,也无法确定这个属性是否有值。

class MyObject {
    private $property;
    public function __construct($value = null) {
        $this->property = $value;
    }
    public function __get($key)
    {
        if(isset($this->{$key}))
        {
            return $this->{$key};
        }
        else
        {
            throw new \Exception("Property does not exist: " . get_class($this) . "::" . $key);
        }
    }
}
$object = new MyObject('value');
$property = $object->property; // 从对象外部获取属性值
var_dump(empty($object->property),empty($property));//true,false 因为属性是私有的